Hike Along Turquoise Mountain Lake Lago di Sorapiss – Can Your Camera Catch These Colors?
Turquoise is positioned between blue and green colors, and Mountain Lake Lago di Sorapiss is located between dream and reality – it exists, but you almost can’t believe it. When you go on your 13.7km hiking trip (map below) be sure to have your camera handy, as the stops include several panoramic viewpoints: Passo Tre Croci, Forcella Marcoira (highest point), the mountain flank of Cima del Laudo, and the lake we already mentioned. What lies ahead, find out here.
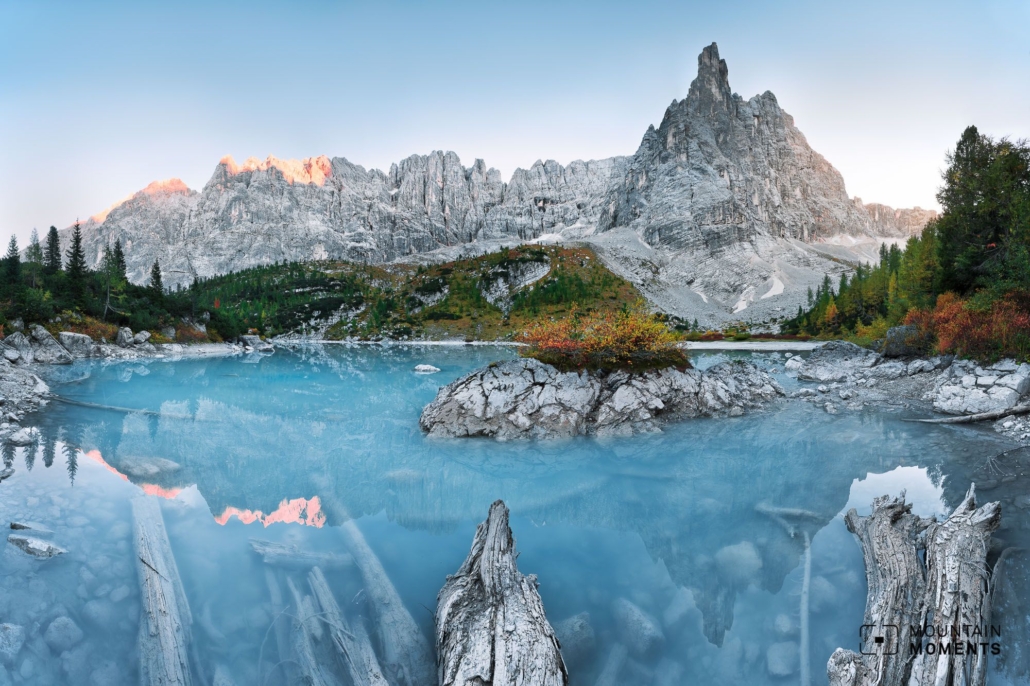
Between Cortina d’Ampezzo and Lago di Misurina (Lake Misurina) lies the 3205 meter high Punta Sorapiss in the mountain range of the same name. It surrounds the small but particularly fine Sorapiss lake (Lago di Sorapiss), which shimmers turquoise blue. The lake is one of many picturesque lakes around Cortina d’Ampezzo. Compared to Lake Misurina and Lake Federa, this one can only be reached by a longer hike and is therefore much less frequented. Lago di Sorapiss is relatively quiet and natural.
The limestone alps and the clean water provide the turquoise blue color that is characteristic of the mountain lakes in the Dolomites. The lake is characterized by an even higher lime content. Thus, the turquoise blue color is particularly strong and clear.
Route description on the way to Lago di Sorapiss
The start is at Passo Tre Croci (Tre Croci pass, 1809m). Take the direct path 213 towards Forcella Marcoira. Go uphill through thinning woods until you reach a crossroads. Here, turn left up path 216 towards Forcella Marcoira. The path runs over alpine grass and finally rises in the stony terrain in the form of serpentines.

At Forcella Marcoira, the highest point of the tour is finally reached. Now cross the mountain flank of Cima del Laudo and go around it on a slightly descending path with a short exposed but rope-secured section (surefooted required in wet conditions). After this passage, follow the path until the next junction and turn onto the path towards the Vandelli hut and Lake Sorapiss (1925m).
Go around the lake counterclockwise. The way back is briefly on the same path as the outward route. At the crossroads where the outward trail climbs to the left, continue straight on along trail 215/Via Dolomiti (Dolomiten Höhenweg) no. 3. This trail runs mostly on one level, but also has some secured spots and should therefore not be underestimated. Along the road a few meters uphill to the top of the pass, the starting point.
Photo tips for Forcella Marcoira that will make your Instagram pop
On the approach along the pass road as well as at the starting point there are numerous beautiful larch forests. Especially in the autumn months, the bright colors of their leaves are particularly attractive. A panoramic view of the opposite mountain peaks from Forcella Marcoira is a rewarding and representative image of the region.
Continuing along the slightly descending path, be sure to capture the shimmering turquoise lake in conjunction with a person in the foreground. The classic photo motif is on the shore of the lake. Here we recommend that a hiker stand on one of the many rocks in the lake.

Mountain Moments Photo Workshops provide Photo Tours for everybody, Alpine Experience for beginners and intermediate-level photographers with 3 to 6-hour routes, as well as Summit Experience for more advanced photographers and hikers. We have private workshops and group classes.
Information on how to join this hiking trip
How to get there by car: A22 Brenner freeway to the Brunico exit, continue on the provincial road to Dobbiaco. Then take the SS51 first to Schlunderbach and continue on the SP49 to Lake Misurina and finally in the direction of Cortina to the Tre Croci Pass. Alternatively, it is also possible to reach the pass via Lienz and San Candido.
How to get there by public transport: The Tre Croci Pass can be reached by bus from Cortina as well as via Misurina. There are also direct bus connections to Cortina from various train stations in the area.
Hike difficulty level: medium – difficult
Duration/distance: 5.5h/ 13.7km
Ascent/descent: 903m/903m
Highest/lowest point: 2309m/1726m
Refreshment stop: Tre Croci pass, Vandelli hut
Start/finish: Tre Croci Pass (coordinates: geogr. 46.556941, 12.201863)
Special hazards: For a technically easier hike, use the described return route also as the outward route.
Tips: The most beautiful motifs can be found here in autumn (October), when the larches turn golden.
The most beautiful photo spots and hikes in the Dolomites – experience this hiking tour and 29 other exceptional trips in the Dolomites now.
 Fancy more hikes in the mountains – and beautiful photos? Get out into nature! Experience the best hikes and locations with our new book: Alps – Photo and Hiking Guide. The 90 best Photo Locations and 30 most panoramic Hikes.
Here we have compiled the most beautiful locations and photo opportunities. 30 hikes with 90 photo spots are selected and described in such a way that you can easily experience these wonderful landscapes for yourself – including GPS tracks and hiking map and all other information.
You can take a closer look at the ebook here– – why not give it as a gift to someone you want to visit and photograph these places with!
Of course, you will find all the information about this hike in the ebook. After registering, you will also receive the GPS track, so you are on the safe side and won’t get lost and will find all photo locations easily.

Hi, i am Marius, i love exploring the mountains and nature. Friends say, i know the mountains better than most locals, but actually i get lost all the time while photographing ;). Read more about the Mountain Moments Team.


